Tuesday 21 February 2012

Collection and Delivery To GBS

The car is as complete as I am going to get it, so it is off to GBS for them to do some final little jobs and for its check over and IVA.  So first off, why have I chosen this route?  Well, I could very easily book my own IVA test and do all the paper work and hope that everything was OK but, for me, and this is only a personal preference, I wanted the peace of mind of knowing that the guys who build these cars everyday will check mine over, set up the suspension, do the tracking, get the engine running so it meets the emission standards and generally give the car a good shake down.  Now don't get me wrong, they don't do all this for nothing and by the time you add in the transport costs, it is not cheap, but I think it is worth every penny.

So I arranged transport with a local company called ARC Recovery.  They have a good track record of moving everything from vintage cars to Bugatti Veyrons.  If they are good enough for the likes of Bugatti, Bentley and Aston Martin, they are good enough for my GBS Zero.  The other advantage is that the truck is covered, so no need to worry if the heavens open on the way up there!(and it is forcast!!)

Before the car was collected I took the opportunity to get some pictures.


Then it was time to load up.


Ground clearance was nearly an issue, but but it went in.  Remember that I haven't set the ride height yet.  I really hope I can get in to my house as that has a small incline that I might ground on.  Oh well, only time will tell!


An finally loaded and secure.  Next stop GBS.


And here she is (yes, it is a 'she') safe and sound at the factory.  I was very flattered to have some very nice, positive comments about the car from the guys there, which I was very chuffed about.


Next time I see her will be in about 3 weeks, I hope, when she will be IVA'd and registered for the road.  I will have to be patient but I think these are going to seem like the longest 3 weeks of my life!!

Final Push to IVA - Part 2

Today I got on with fitting the IVA trim.  The stuff supplied in the kit isn't very nice so I bought some plain trim from Car Builder Solutions (CBS Online).  It is a bit more expensive but it looks nice.  It also already has glue in the channel so when the trim is fitted, it stays fitted.  Other than a sharp knife to cut it, a hairdryer is needed to warm it up and make it a but more liable around the curves.


Even the hot air couldn't get it neatly round a sharp bend so I resorted to 2 pieces of trim and a 45 degree angle to make up the joint.  Looks OK and you only see it if you are looking for it!


On then to the seat belts.  Now it always amazes me that these need to have trim on them at all but you must build to the IVA and if the inspector can get his sphere in there he will check for a radius.  This is rubber trim held on with super glue.


Whilst I had the super glue out, I went round the rest of the trim around the inside of the boot and made sure it was fixed.  Nothing worse that seeing bits of trim hanging off a new car.

Also wired up the front indicators.  Now the GBS wiring diagram shows separate wires for the cycle wing indicators but I couldn't find them so I double them up with the main indicators.  Hopefully that will be OK.

Earlier in the day I had applied a single little blob of Sikaflex to the four ends of the cycle wing brackets.  This held them in place so I could make sure they all lined up.  Final job of the day was to fix the cycle wings in place properly.  To do this I made up some right angle brackets and fixed them in place with more Sikaflex.  They will cure overnight and then they won't be going anywhere!!  If the cycle wings were up to the job I reckon you could almost lift the car with out them coming off.

Here are the brackets.  They will be sprayed with underseal so they don't stand out so much.


I can apply trim and wire the indicators when it has all set.

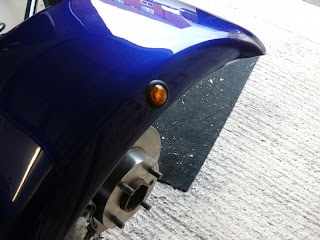
So fast forward to the next day and the cycle wings are firmly secured so the next things to do is to add the LED side repeaters.  These are and IVA requirement to have an indicator at the widest part of the car.  In the Final Push To IVA - Part 1, I showed how I had run cable through the cycle wing bracket.  It was a simple job to wire the light to the cable and then use some Sikaflex to glue the cable out of the way.  This is the finished job.


Next thing to do was add trim to the cycle wings.  I used the same trim as on the nose cone and it was very easy to fit.  It also look really neat and tidy.


All the holes for the for the suspension arms also needed trim applying to them.  This was a bit fiddly but with a bit of patience and some super glue to hold it in place, it worked OK.  There are still a few little things to do, but it is nearly all done now.


I could now move on to putting the car back together and plugging in all the wiring.  Now if you have read through the entire blog (and thank you if you have!) you will know that I went for the GBS plug and play wiring looms and this is where they are worth their weight in gold.  Once they were all connected, I connected the battery and turned on the ignition.  Both fuel pumps, the fan and the washer bottle came to life, as did the warning lights on the dashboard.  Good start.  First job was to unplug the fuel pumps so as not to burn them out as I had no fuel in the tank.  Next, unplug the washer bottle as that shouldn't be working all on its own.  I left the fan for the time being.

This is the mess of me getting everything connected up.


I started to check things, and one by one, tick them off.  Indicators first.  the NS worked OK, but no cycle wing repeaters.  Bugger.  Now for the OS .... they were flashing a bit too fast and not working at all at the back.  Muppet mistake.  When I re-fitted the rear wing, I forgot to plug the light unit back in.  With that sorted, the indicator worked, but as with the NS, the cycle wing repeater wasn't working.  I need to swap the wire round to see if that cures it.

Side lights .... check.  Fog lamp .... check.   Dip beam .... check.  Main beam .... check.  Hazards..... check.   Horn .... check. Instrument lights ... check ... wait, no, the tacho one didn't work.  Again, my error, I missed one wire to earth.  With that resolved, they all worked.

Next, power to the Sat Nav and iPod.  Nothing.  I think I was trying to be a bit too clever and a bit of re-wiring and a fuse later, they now have power.

The starter button doesn't work, but that can wait.  I am not too bothered about that.  If Simon or Ben can sort that when the car is at GBS then so be it, if not, I won't lose any sleep over it.

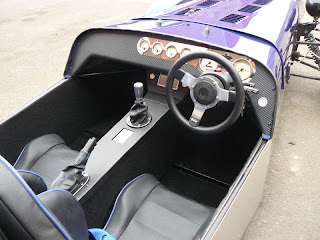
Next job was to get the dashboard fitted and the scuttle bolted down.  Then I could fit the pedal box properly.

Fitting the dash was a bit fiddly, but it went in the end.  I could then bolt everything down tight for the last time and fit the pedal box.  Finally a bit of trim round the dashboard edge and it all looks like a proper job.

Wednesday 15 February 2012

Final Push to IVA - Part 1

I am now on the home straight getting as much done as I can before the car goes back to GBS for them to check over and put through the IVA.  More on that in a later thread, but for now, I am starting to, carefully, put the car back together.

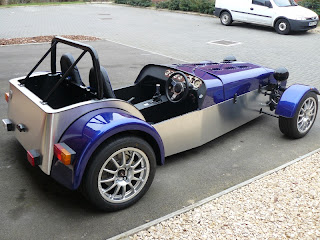
First job was to re-fit the rear arches.  Here is the nearside one.


Here is the inside.  I have had a stone guard sprayed on to the insides of the arches, mud guards and nose cone to help the paint finish and also to protect them from stone chips cracking the GRP from the inside.


Here it is with both fitted.


This is the inside of the nose cone.  The indicators have been fitted as has the grill.  I have used some little brass collets to stop the grill falling out.  Not that it would as it is quite a tight fit.


Here is the nose with the indicators fitted.  They still have to be wired up.


Next job was to run some cable for the cycle wing indicators.  I started by drilling a hole in the cycle wing bracket and once it was large enough, added a rubber grommet.  


Next I fed a length of 2 core cable through the hole and up the bracket arm and out the end.  I made sure I left enough to wire to the indicator.  At the other end, I ran the cable along the upper wishbone arm, securing with cable ties, and then in to the engine bay, ready to wire up.  I made sure there was sufficient 'give' in the cable for when the car is on full lock.


With the wiring in place, I moved on to start positioning the cycle wings.  Now it must be said that these do not fit very precisely as the angle of the arms is not square to the tyre.  I tried to bend them a little further so they were square, but they wouldn't budge so I just laid the wings on as best I could and lined them up by eye.  I need to check the orientation for the IVA before I start bonding them in place.


Here is a view from the front.


I then trial fitted the pedal box.  I had to make a few alterations and tweaks to make the accelerator pedal fit, but it looks pretty good and all seems to work.


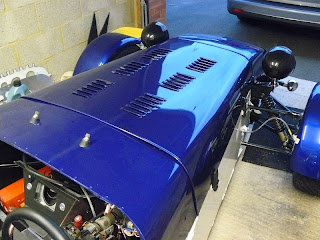
Finally I realised that I hadn't actually fitted the bonnet with the pedal box in place, so I fitted that to make sure it still fitted.  OK it was also an excuse to take a couple more pictures.


I still need to add some foam trim round the edge of the nose and under the bonnet edge on the scuttle, but it is getting closer to being ready to go.

I also did a little bit of tidying up of some of the wiring under the scuttle.  I can't do it all as I had to remove the Sat Nav to lend to my daughter.  Once I get that back I can put it all together, connect the battery for the first time and see what does and doesn't work.  Hopefully  buying all the plug and play looms will pay dividends here.  

Monday 13 February 2012

Change of Colour - Painting the Panels

Now first off I must hold my hands up and say that none of this is my work.  I am very lucky to have a son in law who is an estimator/smart repairer/paint sprayer working for Mercedes Benz and all the excellent work you see here is his.  I would say take a bow Stuart, but he is a bit camera shy!  I think I managed to get a picture of his knee when we were fitting the engine but other than that, he has been elusive!

Anyway, when he offered to paint the car for me, I jumped at the chance.  Logistically, it was not going to be easy, so I took the decision, initially, to just get the removable panels done first. I can get the rest done later if I want.  So all the panels I could take off the car were removed and everything stripped from them and then taken to the body shop.


Now wouldn't it be great to be able to say this was your workshop.  Purpose built, spotless, all new ..... we can but dream!!

Now again I must hold up my hands and say that I was totally naive as to how much work is involved to get a great finish.  I thought he would only need a few hours!!  More like a few days!!  I have a new found admiration for the work he does.  First job is to prepare the surfaces.  Now bear in mind that the panels from GBS are pretty good to start with, not perfect by any stretch of the imagination, no GRP panels will be, but good none the less, so no remedial work was required to 'fix' anything.

So he started with a sander to 'key' the surfaces.


Then it is in to the paint booth/Low Bake Oven.  The temperature is set to run at a constant 22c whilst painting and then turned up to 65c to 'bake' the paint.


First stage is apply an undercoat.


Next job is to apply the colour.  You can just about make out the paint name, it is Ford Imperial Blue as used on the Escort Cosworth.


Here is the paint applied as a base colour.  Looks very flat at this stage.


Then the magic happens when the lacquer is applied.


The finish is amazing but I nearly fell of my chair when he said they still have to be polished and a protective sealer applied!  I didn't think they could get any more shinny.

Next job is to, very carefully, start putting the car back together before he comes and finishes the job, probably after IVA.

So again, a big thank you to Stuart for doing such an amazing job and to Sytner Mercedes Benz for allowing him to use the body shop to do it.